YOUR FIRST TIME USING VAMX
Open the vamX Intro scene.
You should start with the in-game, interactive, main tutorial.
You can open the tutorial any time you see the vamX Menu, by going to the Scene tab -> HELP -> vamX MAIN TUTORIAL.
THE VAMX MENU
The main tutorial will explain how to use the vamX menu. To show the vamX Menu in VR press either of your VR controller’s trigger buttons. Then to press menu buttons (or move things in-game), use your controller’s A button, or for Vive wands press the center of the trackpad. If you ever lose track of the vamX menu in VR, point your controller in front of you and press the trigger button until you see the vamX menu.
TO START SEX
1) Choose a pose from the Pose tab (start with the middle Bed / Floor pose).
2) Optionally, choose her partner from the Male tab.
3) Press Start Thrust from Action.
4) Sex starts very slowly, to speed it up, slide the Arousal to Climax slider.


VR PERFORMANCE – TROUBLESHOOTING LOW FRAME-RATE IN VR
Virt-a-Mate will push the limit of any CPU/GPU when played in VR. You should expect the scene animation to update at 30fps maximum (although turning your head will generally still refresh at 90fps to prevent VR nausea). If the game slows down as you create your desired scene, try any or all of the following:
1) Run vamX Menu -> Plugins Tab -> Give Me FPS -> Standard. You can also set the general Virt-A-Mate graphics quality to a lower quality setting in this menu.
2) Turn off soft-body physics, disable mirrored surfaces, or lower the same graphics quality setting, in the Virt-A-Mate Menu (in VR press your controller’s Menu button/B button to open the Virt-a-Mate Menu) -> Main UI Button (3 horizontal bars) -> User Preferences tab -> Performance Tab. Turning off soft-body physics dramatically improves speed during dancing and other animations.
3) Remove clothes using the Clothes & Hair tab.
4) Hide the Male, so that only the Female is shown, or reduce the number of people in the scene if using more than 2 people.
5) Switch to the simple black scene to remove the environment and focus on the action (1st item on the 2nd page of Scene).
For faster load times, run Virt-a-Mate from an SSD or a USB 3.1 flash drive designed for high speed read and write. To do this you
would need to create a new Steam library or move your existing Steam library.
KNOWN INCOMPATIBILITIES
Citrix is incompatible with Virt-A-Mate (and many other games). If Virt-A-Mate doesn’t open (crashes on startup), please see https://steamcommunity.com/discussions/forum/1/1743358239830363122/
USING THE VIRT-A-MATE MENU SYSTEM AND USER-GENERATED CONTENT
Virt-a-Mate provides a set of complex tools, and vamX makes Virt-a-Mate easy. Start by following the main vamX tutorial by pressing HELP (from the bottom of the vamX Menu Scene tab) -> vamX MAIN TUTORIAL.
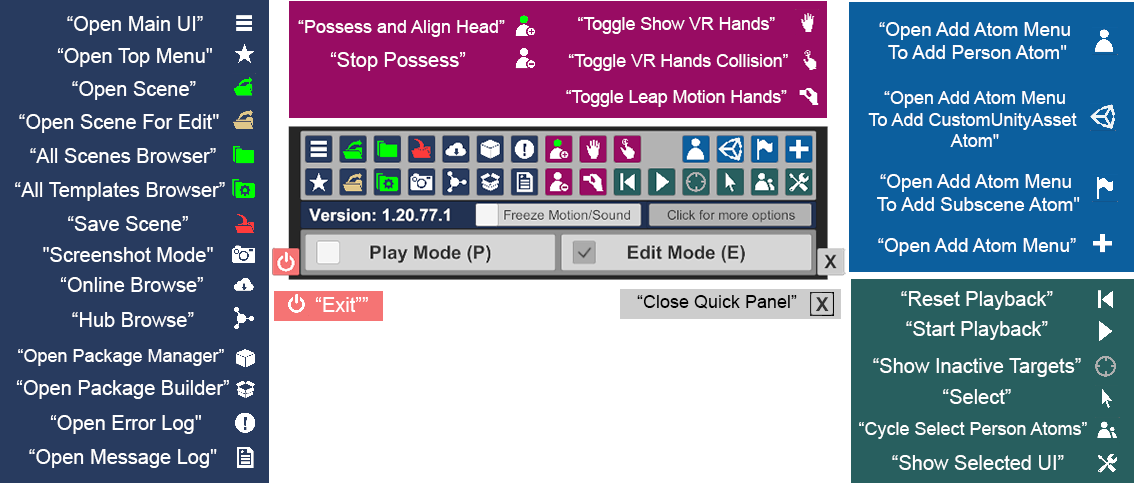
After you are comfortable with vamX, you can learn in-depth about the Virt-a-Mate menu system.
To open the Virt-a-Mate menu system, press Toggle UI in Desktop Mode, or your Controller’s Menu button / B button in VR.
The “Virt-a-Mate” menu system, shown here, is a more complex menu system that lets you add user-generated content, and where you can learn to fully customize all aspects of scene, for example to sculpt hair, add a custom texture to a clothing item, and much more.
Most tutorials assume that Virt-a-Mate will open in the Virt-a-Mate Top Menu, not in the vamX scene.
To get to the Virt-a-Mate Top Menu, which includes the VaM Hub with user-generated content press the star icon on the left side of the Virt-a-Mate menu. If you don’t have the Virt-a-Mate menu open, first open the Virt-a-Mate Menu by pressing Toggle UI in Desktop Mode, or your Controller’s Menu button/B button in VR.
You can find a description of the buttons at https://hub.virtamate.com/wiki/base_ui_breakdown/
To learn more about the Virt-A-Mate menu system go to: https://hub.virtamate.com/wiki/
Watch the YouTube tutorials: https://hub.virtamate.com/resources/youtube-tutorials.6672/
Join the Virt-A-Mate discord: https://discord.gg/7RDRf64
From the Virt-a-Mate Top Menu (star icon) you open the VaM Hub and download user-generated content.
Only add additional content to Virt-a-Mate once you are familiar with vamX. Working with user-generated content can be more
complex than using the easy vamX Menu system with the built in looks and environments.
If you download and open a scene from the VaM Hub, it won’t have the easy vamX menu as a part of it by default (it has only the more complex Virt-a-Mate creator menu system).
You can add the vamX Menu to any scene by opening the Virt-a-Mate main menu, then pressing the Add vamX button.
If the scene only contains a look (person) that you want to interact with, then you can press the Add vamX button to easily start using vamX with that look.
If the scene you open contains an animation or complex user interaction, it may be designed to just be experienced as it is, and may not work easily with vamX poses or actions. You should only combine additional user-generated content with vamX once you are familiar with vamX and how to use vamX. Start by exploring some of the tips and tricks from the section below before trying to combine vamX with user created scenes.
LOADING & SAVING CUSTOM LOOKS (VAM HUB)
When downloading a look / person from the VaM Hub, the “look” is often only delivered as a scene (not saved as a look or appearance file). If the look is only in a scene, it can’t be used in another scene, or loaded by vamX, unless you first open that scene and save the look.
If scene contains a look (person) that you want to save and use later, you can save without adding vamX: Open the Virt-a-Mate menu -> Edit Mode -> press the Cycle Select Person icon (shows two people) to select the person -> then press Save Look… (or save from the Appearance Presets tab by entering a Preset Name, then pressing “Create New Preset”). You can then switch scenes and load the look into that new scene, by selecting a person in the new scene, then going to Load Look or load from the Appearance Presets tab.
You can also save the look using vamX. Open the scene with the look in it, then Add vamX (in the Virt-a-Mate menu next to Edit mode) then go to the vamX Menu -> Female tab -> Load & Save Looks -> SAVE Custom Looks. In the future, when using vamX, you can then load the look by going to the vamX Menu -> Female tab -> Load & Save Looks -> LOAD Custom Looks.
You can also save & load clothes or hair styles this way.
Some Custom Looks (mostly those that have an anime style) contain hair or other objects that can’t be saved as a look (they are actually Scene Atoms and not real hair, etc.). To use this kind of look in vamX, it’s better to just load the look’s scene, then Add vamX so you have the correct hair and other Atoms (in the Virt-a-Mate menu next to Edit mode press Add vamX).
USING VAMX – TIPS & TRICKS
To improve frame rate in the default room turn off the mirror by going to the Virt-a-Mate Menu -> Main UI (three
horizontal lines) ->User Preferences -> Performance -> and uncheck Mirrored Surfaces Enable.
To adjust the penis placement, fix the penis falling out, or convert a vaginal sex pose into an anal sex pose
use the Penis Length and Penis Position sliders. These sliders only appear while you are in the Action tab. You can use these to shrink / expand and position the penis (and general location of the male) for best alignment during sex.
To use a dildo / penis instead of a male: If a male is shown, press the Male tab, then press Hide Male. Press the Other tab
-> Sex Toys -> then press any icon with a penis or dildo image. It may feel more immersive (and uses less computer power) to have a dildo instead of a full male character.
To animate a dildo: Once you have a dildo shown you can move it by pressing Action, then choosing a male action such as Male
Thrust. Male Deep doesn’t work well with dildos.
To manually control a dildo: After adding a dildo, go to the first page of Other -> Sex Toys and press GRAB current DILDOS. You can then grab and move the dildo. For an even better experience in VR, click Plugins, and add the Possess Sex plugin. You can then, in VR, see a Link Dildo button. Place one controller on your hip, and move your hips near the dildo. With the other controller press Link Dildo. You can then move your hips to move the dildo.
Working with sex toys. Remove, detach, reattach, or fix the alignment of sex toys: In Other press Sex Toys. If your toy is not in the correct place, or you want to reattach it, find and press that toy again (especially after changing poses with the built-in dildos). If you want to remove the toy you have to find its page, then press Remove These Items. If you want the female to grind against a vibrator, or onto a butt plug, first set the female in motion by going to Action -> Female Thrust (or another movement pattern) then in Other -> Sex Toys press GRAB BUTT PLUGS or GRAB VIBRATORS. The sex toy no longer moves with the female, and can be positioned by dragging in the scene.
To Cum as a male: Open the Orgasm Options Menu by pressing the last button in the Action tab. Click Preload Cum Textures (if needed) then press Male Cum.
LGBT SUPPORT
To create a Lesbian scene: In the Male tab, choose a female from the second page.
To create a Gay Male scene: Open the 3rd to last page of the Female tab and choose any male look. There is currently only one main male voice, but more will be added soon. You can change the pitch of the male voice in Sound -> Speech & Moan Options -> 3rd Page -> Male Voice Lower / Higher Pitch. There is also a secondary male voice you can use by going to Plugins -> 4th
Page -> VAMMoan Menu -> and choosing the Seth voice for one of the people.
To create a FUTA or Trans scene: Open the 3rd to last page of the Male tab and choose the FUTA / Trans look. You
can then press New MALE LOOK to generate additional random FUTA / Trans looks. There are also many FUTA / Trans looks available on the VaMHub at hub.virtamate.com. If you loaded a FUTA / Trans look on what was the Male (the
penetrator), then you can deepen the female voice into more of a Trans voice by going to Sound -> Speech & Moan Options -> 3rd Page -> and press Male Voice Lower Pitch a few times (when pressing this button you’ll hear a sample of the default male voice, but the FUTA / Trans female voice will also lower in pitch). If you load your FUTA look on the “Female” (penetrated person) then you would change the voice pitch by using the Speech & Moan Options -> 1st Page -> Lower / Higher Pitch.
To create an MMF Double Penetration Threesome: The new standing supported pose is an MMF threesome double penetration pose. You must first select 3some -> 3some with BI MALE and choose a male look. Then choose the pose on the second Pose page where the female has her legs wrapped around a standing male.
To create a BDSM scene: Other -> Bondage, Domination & Role Play. In the first few pages you can dress your character and add items like nipple clamps, blindfolds and more. In the last few pages you can restrain the female character with cuffs and chains and other items. You can also create a new random BDSM scene in Other -> Create New Looks & Scenes -> Random BDSM SCENE (requires you to have installed the AddOns).
To create an alien / robot / demon scene: Other -> Create New Looks & Scenes -> 3rd Page. On the 3rd page of Create New Looks you can create strange Alien / Robot / Demon looks for male and female characters. You can also add Fantasy items, such as
wings in Other -> Sex Toys & Fantasy Items on the last couple of pages.
The third person in a threesome can be set to dance. Go to Other -> Dance. Press under the vamX UI where it says Animate: Female until you see Animate: 3some. Now when you choose any of the dances, it will cause the third person / 3some person to dance.
To hear your own custom music / mp3 audio: Name up to 7 music files Music1.mp3, Music2.mp3, etc., and place these files in
your Steam Library/steamapps/common/VaMX/Custom/Sounds folder. In vamX go to Sound -> Local Music & Sound. Press the left arrow to go backwards to the last page. On the last page of Local Music & Sound you’ll find buttons to play the 7 custom music files.
Toggle on/off the vamX UI using your VR controller’s trigger buttons. If you have two VR controllers active, only one of the
triggers will toggle on/off the vamX UI (allowing you to also press trigger without toggling the vamX UI if you wish).
Add fog and mirrors in the last pages of the Light menu!
Go to Female -> Fantasy Character Builder for many ways to quickly and easily customize / build a female look.
To change the look of the vagina / labia / clit go to Female -> Fantasy Character Builder and go to the last page (which
is easiest to get to by pressing the back back arrow key once from the first Fantasy Character Builder page).
If you press Smart Thrust it controls the speed and type of action, as well as variations within the current pose and hand movements.
If you want automatic hand movements only, but to manually control pose, speed and other actions, click Stop Thrust, then click Smart Thrust ADD HAND MOVEMENTS.
This same trick works for adding pose variations only, or hand and pose variations while maintaining manual control of action speed and type of male and female thrusts.
In Sound -> Moans & Female Voice you can configure her moans. For moan sounds only, without English words, choose
Moans Only (Belle). For the original sound set choose Moans Only (original).
If you are using the default Dirty Talk & Moans (Belle) you can choose to have a more innocent style of Dirty Talk without fuck / cum, etc. by choosing Clean / No Swearing.
Dialog is designed to be spoken by a woman, but the dialog can be used for gay males. Arousal dialog (not stories) automatically adapt to lesbian and gay partners by removing text that doesn’t make sense (your dick feels so good in my pussy). To make the voice sound more male (it’s not perfect) open Sound -> Moans & Female Voice and lower the pitch by a few button presses.
Go to Other -> Stories Talking & Text to start a story. [C] indicates relatively clean dialog, [E] indicates dialog with more
swearing or that is more explicit. For example clean dialog may be “I need you” or “Oh, that feels so good”. Explicit dialog includes all clean dialog plus items like “Fucking give me that cum”.
While in a story you can control the story progress using the Story Controls (which open automatically when starting a story). In a story one or more sentences are spoken, and then there are often pauses. To skip to the next sentence, or skip over a pause, press the Play Next Line button.
Stories generally progress with some talking that sets the scenario, followed by actions such as undressing, and leading into sex. To skip to the next sexual stage (sort of next chapter of the story) press Skip to Next Sexual Stage.
If you wish to stay in the current stage with no further talking or progress, press Pause Story (then press Play Next Line to resume).
When stories finish the Story Control menu will close and the Pose menu will open, so you can continue into additional sexual interactions.
For variations on a story, open the Other -> Emotions menu and choose an emotion, then start the story to have that emotion as her
general mood for the story.
To use your own look for a story, uncheck the Load Female checkbox in Other -> Stories Talking & Text.
First load your chosen look, then start the story, so vamX can alter your look as needed to fit the story, for example by loading appropriate clothing to strip, or changing to an android skin for your look, etc.
When in a story, in the story controls area, note there is a second page of story controls. In the second page you can stop the background music, and change her lip movement size.
Improved Possession. Clicking Possess + in VR opens a possession menu. Clicking Possess Male (or Possess Female) turns on only the relevant nodes for that person, so you don’t accidentally possess the wrong nodes. If you have Vive trackers, or want to 2-stage possess the hip, pelvis, or penis-base for linking a controller to hip movement, click Add 2-Stage trackers. For full body possession there is also a 2-Stage 5+ trackers button. If you want to Possess the male, but have one controller controlling the female pelvis or head for manual movement, first press Possess Male (and step into the male), then in the female section press Add 2-Stage 3 Trackers for the female (and link a controller or tracker to the female node you want to control).
If you have trouble connecting Vive trackers, go to Settings (or Devices -> Controller Settings) -> Controllers Tab
-> Manage Vive Trackers. For each tracker you must select a role (doesn’t matter which role, just any role even the wrong one) from the following set: Left Foot, Right Foot, Left Shoulder, Right Shoulder, Waist, Chest, Camera, Keyboard. After changing roles you must restart SteamVR!
If you want to play both web audio and local background music, you must start the local background music first, then start the web audio. Press on local background music stops web audio.
To enable Male Moans press VAMMoan Males Moan on the 4th Plugins page.
To improve FPS enable Give Me FPS on the 1st Plugins page.
To stop vamX from controlling head movement and setting default female facial expressions, press Stop vamX Head Control & Expressions from the 2nd Plugins page.
For different personalities / expressions enable one of the E-Motion profiles on the 2nd Plugins page.
If you want your controllers to vibrate when you touch people (Oculus Only!) press Touch Feedback on the 2nd Plugins page.
For alternate types of Female Moans use VAMMoan or Life Moans on the 4th Plugins page.
For various minor improvements, press Add All Plugins On This Page on the 5th Plugins page.
When you enable clit toys (vibrators) in Other -> Toys, the female pussy now vibrates. You can also manually turn this on by pressing Labia Vibration on the 6th Plugins page.
You can create a BJ with simultaneous HJ by selecting the BJ pose in the Pose tab, then adding the Silver Hand Job plugin on the 6th Plugins page.
To get both people to try to kiss in any pose, add Silver Kiss in the 6th Plugins page.
If you want her to thrust in response to spanking, add Spankings with Moans and Hip Thrusting from the 6th Plugins page.
If you want the 3rd person (threesome) to have more of a personality, you can add E-Motion (or other plugins) to the female, then press Copy Female Plugins to Threesome on the 7th Plugins page.
If you want to set up a scene with 3 lesbians, press the Male tab, then select a female look on the 2nd page, and also add a 3some. Then add VAMMoan on the 4th Plugins page. This adds different sets of moan audio to each female, so each female has a unique voice.
If you want to set up a scene with 3 gay men, press the Female tab, and on the last page select a female look, and also add a
3some and set the 3some to be a Bi Male. Then add VAMMoan on the 4th Plugins page. This adds different pitches of moan audio to each male, so each male has some variation in voice.
If you want to add other (non VAMMoan) plugins only to the male, or threesome, you first need to add them to the female, then use Copy Female on the 7th Plugins page, and then Remove All Plugins From Female. The male / threesome will then be set up as you wish, and you can now add whatever female only plugins you want to the female.
If the penis and pussy don’t quite align, you can drag the penis position slider or go to Action -> Stop All, adjust the pose manually, then go to Pose -> Custom to save the current pose as a custom pose. Once you’ve pressed Custom Pose, if you go to Action
-> Stop All it will reset the pose to that Custom pose. Also the thrusting actions will be recalculated to hopefully correct the
alignment during sex. The thrusting action should automatically work based on common sexual activities such as sex, hand job, blow job, female dominant sex, etc.
You can use the Add vamX button attached to the Virt-a-Mate main menu to add vamX to any Virt-a-Mate scene (instead of manually merge loading).
To use vamX in any scene by Merge Loading vamX open the Virt-a-Mate main menu -> main UI (the upper left corner of the UI
with three horizontal lines). Go to the File (Open/Save) tab, then press Merge Load Scene. Choose the latest vamX.1.x package from the left side, then choose the correct Merge Load scene based on if your scene has no people, one person, or multiple people. Merge Load 1-minute demo video on RedGIFs or Slushe (Slushe can be slow) Merge Load Tutorial Video on Mega or X VIDEOS (set the quality in x videos to 1080p).
If adding vamX to a scene with two or more people, merge load “Merge Load vamX into Scenes With People”. If the scene
already has animation, the animation will continue until you load a new Pose (for example if you just want to swap around looks, change hair, lighting, etc.). If a scene starts with, for example, foreplay, you can then switch to sex by pressing any vamX sex pose. When you first switch to a vamX pose the main people are attached to you (your view in desktop mode or your controller in VR mode). Move the people near the location you want, then press END MOVE (or the Virt-a-Mate menu vamX UI button).
Make sure they aren’t intersecting any other objects when you press END MOVE. If its hard to get the perfect position, just put them near your final position (not touching any objects), then press START MOVE again to further adjust and fine tune the position. If you have a third person in the scene, and have chosen a pose where the third person stands separately and watches, you will have the chance to set the third person’s positions once you finish setting the couple’s position.
Many scenes are often just one, non-animated female (“look scenes”). For these types of scenes (or any scenes with only one person), merge load “Merge Load vamX into Scenes With Female Only” to start using vamX with that look / scene. After merge loading vamX, the easiest way to start using the scene is to first select a Pose, (enable the Male if you want) then go to Action and start an action. You can also start her dancing (although it will be in a sort of random place in the scene) through Other -> Dance. If the scene is just a look, without much of an environment, go to Scene and choose a scene for optimal placement of poses and dances with that look.
If the scene is just an environment without any people in it,
merge load “Merge Load vamX into Scenes Without People”. When loading
into an environment without any people the vamX female appears, and is
attached to you (your view in desktop mode or your controller in VR
mode). Move her near the location you want, then press END MOVE (or the
Virt-a-Mate menu vamX UI button). Make sure she isn’t intersecting any
other objects when you press END MOVE. If its hard to get the perfect
position, just put her near your final position (not touching any
objects), then press START MOVE again to further adjust and fine tune
the position.
When you want to change to a new scene after merge loading a few scenes, it’s often a good idea to reset Virt-a-Mate to make loading further scenes faster.
Open the Virt-a-Mate main UI (the upper left corner of the UI with
three horizontal lines). Go to File (Open/Save) and press Hard Reset
(red button near the bottom). It’s often quicker to hard reset, then
load a scene, instead of just directly loading that scene.
Improved move poses. Now, after you set the couple’s pose, if there is a third person, you then set the third person’s location.
You only set the third person’s location if the person is standing
separately, not if they are part of a vamX threesome pose where all
people are touching. As before, move poses sets locations separately for
standing poses and lying down poses. Lying down poses include all poses
that aren’t standing, including seated poses. Once a standing location
is set, all further standing poses load at that location. Same for
lying poses. You can manually move poses any time by going to vamX UI
-> Pose -> START MOVE.
Try turning on Male Moans by clicking Sound, then Male Moans ON. Male moans are off by default in VR, and on by default in Desktop mode.
VOICE COMMANDS
You can control most of the vamX UI / functions through voice commands / speech recognition.
You can have an entire experience using only voice commands, for
example: Change clothes. Again. Let’s go to the roof. Will you stand up?
Wear a dress. Put on something sexy. Let’s go to the pool. Would you
turn on some music? Something else. Change the lights. Dance for me.
Wear something for a strip tease. Now strip. Get naked. Let’s have sex.
Let’s do it in the bedroom. Faster. Touch your breasts. Put your legs
back. Can you do the splits? Turn over. Let’s do it doggie style. Sit on
my face. Straddle me. Come on top of me. Touch my face. Are you ready
to cum? I’m cumming.
1) Set your Windows default microphone before opening Virt-a-Mate
2) Have the Virt-a-Mate window active (the last selected window, select it by clicking on the icon in your task bar, not Alt-tabbing to it) Learn more about voice commands
You can turn off voice control by unchecking the Speech Recognition
checkbox at the bottom of the vamX Sound tab. If turned off it stays
off (even when reloading VaM) until turned on again. Voice recognition
is performed locally on your computer by Windows 10.
Improve FPS using the new Speed (fps) & Quality button, in the Light tab.
You can disable mirrored surfaces for a major increase in fps in the
default vamX scene. You can also choose to switch all scene lights to
vertex for speed increase, or use the new vamX ADAPTIVE pixel lighting.
ADAPTIVE pixel lighting automatically switches lights between vertex and
pixel based on their closeness, without creating flickering
(Virt-a-Mate’s default implementation for Auto light switching creates a
lot of flickering lights). It’s based on the number of pixel lights you
have set in the VaM User Preferences -> Pixel Light Count.
When switching to a dance animation in a custom / merge loaded scene, the people and any required items (like a stripping pole) are linked to your view or VR controller. Move them to where you want the dance or sex animation to take place, then press trigger on your VR controller, or in desktop mode press the Virt-a-Mate main menu’s vamX button, or the vamX Pose END MOVE button.
Set emotions / facial expressions for all three people in the scene,
including for male people. In other -> Mood / Emotion, choose which
person you want to change, then set any static or changing emotion. Males can now both speak and have emotions.
Experimental Orgy functionality. Add an additional couple to vamX. This will dramatically lower your frame rate. This functionality is for advanced users, or users willing to play around until they get the desired results. Not all vamX features work with orgies. 1) Create an Orgy in the 2nd page of the 3some tab. 2) Adjust the new 2nd couple by pressing “All vamX Controls Orgy M & F (2nd couple)”. 3) Change poses, or female / male looks, and they will apply to the 2nd (new) couple. 4) Go to the 3some tab and switch back to the Default M & F
(1st couple) any time to change the original couple. You can keep
switching back and forth to configure both couples. You can also add a
threesome to have one couple and one threesome. Not all combinations
and features will work well, and some settings may be lost or changed
when switching which couple you are controlling with vamX. In the
future, there will be poses added that have all 4 or five people having
sex together.
You can change male & female hand poses (for masturbating, stroking, etc.) in the 2nd page of the Pose tab. You can also enable move/gyrate on the hip hands & head, and pose or move the mouth and tongue (have her stick out her tongue and lick). These changes only last until the pose is changed. Use Action -> Just Thrust (instead of Action -> Start Thrust) or choose thrust options in the Auto Thrust menu to prevent automatic pose changes.
FLESHLIGHT & OTHER SLEEVE TOYS
If it’s your first time using a Fleshlight, or you are considering
purchasing a sleeve to help simulate sex in vamX, try the Turbo Thrust
Ignition (softer sex / blow job / good all around). Jenna Haze
Obsession, Stoya Destroya, Riley Reid Utopia, Mini Lotus and Heavenly
also receive good reviews. Many people have the experience that the
sleeve feels better and better over multiple uses (as you get used to
the sleeve). When starting, especially if it’s your first time using the
sleeve, warm the sleeve for 5-15 minutes in very warm water (not so hot
that you can’t leave your hands in the water). Put it into the case.
Don’t fully close the back cap of the Fleshlight so the suction isn’t
too high inside (try half way closed). You need to use lots of water-based lube, and it’s best to warm your lube also (in a closed bottle). Then after, you need to clean (by rinsing thoroughly with warm water) and dry your sleeve. We recommend carefully turning each end of the sleeve inside out for a short time
to clean and dry it, although this can damage your sleeve if not done
carefully (we recommend it, but it’s controversial). To clean more
thoroughly, use 70% isopropyl alcohol (only). Take the time to learn
more about cleaning and care online.
VAM SYNC (VAMSync) FOR THE HANDY AND STROKING TOYS
You can sync The Handy, Fleshlight Launch, Kiiro Keon or other
stroking toys / machines to vamX. The Handy is recommended due to the
sync at low and high speeds being more accurate / less stuttering.
To sync these toys you need to install VAM Sync (by qDot / Zengineer).
Install VAM Sync 2.0 or 3.0: https://mega.nz/file/pNBASbpa#IsfsM4bms0eTG8eiYBGkEkBHYRjny49lCBwnPOgsrus – or download from – https://github.com/intiface/VaMSync/releases/
– or if you have a zip file browser like 7-zip – You can extract and
run the vamsync-installer.exe from the latest vamX package in the
var/Custom/Scripts/Other/VaMSync-2.0 folder
If you downloaded a .zip file, you only need to run the
vamsync-installer.exe, the other files / scripts are not required when
used in vamX.
The installer isn’t signed, so you’ll need to press More info, then Run anyway, to install.
You must only install VaMSync once. After that, if you need to
reinstall, you must first uninstall VaMSync using Add/Remove Programs,
then install again.
After installing, you can open VAMSync from your Start Menu. One way
to find VAMSync is by opening your Start Menu and typing VAMSync. Open
VAMSync now.
To Connect The Handy to VAM Sync You Must Have Firmware 3.0 or Greater.
Attach the power to your Handy, then hold down the oval button
directly above the power light on your Handy until you see a blue light.
If the light starts slowly pulsing blue, you have firmware 3.0 or higher and can continue.
If you can only get a purple light or a quickly flashing
darker/lighter blue light (or the next step of connecting to VAMSync
doesn’t work) you must update to firmware 3 at https://www.handysetup.com
For vamX 1.13 and higher, go to Scene -> Help -> Feel
vamX with Moving Sex Toys for a tutorial on using VAM Sync with The
Handy and other toys.
How to Sync Your Toy with VAM Sync
1) Open VAMSync from your Start Menu (if it’s not already open).
2) Set your toy to Bluetooth mode (for Handy, connect the power then
hold the button above the power light until it slowly pulses blue).
3) Your device should show up in VaM Sync under the Stop Scanning
button. If it doesn’t, pres Stop Scanning, then Start Scaning and wait
for a few seconds. If that doesn’t help update your toy’s firmware or
check your computer’s Bluetooth. If your toy was connected but lost
power or stopped working, power off your toy, close VAM Sync, power on
your toy and set it to Bluetooth, then open VAM Sync and see if your toy
appears.
4) Check the box next to your device to connect.
5) Open vamX, then click the Plugins tab. Then follow the instructions below based on what version of vamX you have:
Go to Plugins Page 1 -> Control The Handy Launch & Other Toys
-> Start VAM Sync. You can then use the Position Lower / Higher
buttons and Range Lower / Higher buttons. Go to Scene -> Help -> Feel vamX with Moving Sex Toys for a tutorial on using VAM Sync with The Handy and other toys.
For older versions of vamX click the VAM Sync button
on the 3rd plugins page, but the sync in older versions of vamX was
less accurate, sometimes inverted, and doesn’t allow you to fine tune
range or position in the vamX menu system.
OSR2 COMPLEX MULTI-AXIS STROKER
To use the OSR2+ in vamX go to Plugins -> 3rd Page -> and choose either the TCode or Random Stroker plugins.
TCode makes the OSR2 respond to the actions in vamX.
This is the standard way of using the OSR2 with vamX. When the girl in
vamX moves up, it makes the OSR2 move up, if she wiggles her hips, the
OSR2 wiggles. Basically, you feel something similar to what you see in
vamX.
The Random Stroker generates its own female movements,
sending those to both the OSR2 and overriding the vamX female
movements. This controls both the female and the OSR2 together, creating
female movements based on movement patterns that feel good when used
with the OSR2. The vamX version of the Random Stroker integrates into
the vamX Arousal to Orgasm system, so the random movements generated
make sense based on the female’s building arousal. The Random Stroker
plugin won’t work in all poses.
There are two OSR2 TCode control options:
TCode 3.2 – Accurate Thrusting
TCode 3.2 accurately moves the OSR2 based on the real relation of the vagina and penis. Negatives: Due to this accuracy there is very little rotational movement of the OSR2, and if the penis falls out the OSR2 stops. Positives: The thrusting (OSR up & down movements) are much better and more accurate, and can be configured in vamX to focus on the penis tip, penis base, or have larger or smaller thrust.
Because this is based on the real positions of the penis and vagina,
you can do things like possess the male or female hips in VR, then move
your VR controller to manually control OSR2 thrust (making sure the
penis doesn’t fall out).
TCode 2.1 – Bigger Rotations and Non-Thrusting Movements
TCode 2.1 has much larger side-to-side and forwards-backwards rotations since it’s based on the female hip controller movements as instructed by vamX. Negatives: Less realistic, includes more OSR2 rotation and other movements than are actually seen in vamX. Positives: More stimulating due to larger OSR2 rotating side-to-side, forwards-backwards, and other axis movements.
Advanced Users: In case you want to manually edit
plugin parameters all OSR2 plugins are added to an Atom named
Plugin_OSR. When starting TCode or the Random Stroker, that Atom is
automatically selected, so if you don’t click anywhere else in the
scene, and set Virt-a-Mate to edit mode, you can click the Plugins tab
of the Plugin_OSR object, then Open Custom UI… for manual
configuration. Manual configuration may not be needed due to all of the
vamX buttons that control these plugins, including initial port
selection.
vamX Mods of TCode Plugins and Random Stroker PluginsThe versions of TCode and the Random Stroker in vamX are modified to be easier to use, and to work well in vamX. These versions:
1) Allow you to instantly switch between TCode 3.2, TCode 2.1 and Random Stroker plugins
with a single button click. The last OSR2 serial port is remembered,
and shared between plugins, so the OSR2 doesn’t skip a beat when
switching plugins. This can allow you to quickly check to see what feels best to you in the moment, then change plugins any time.
2) Work with vamX menu buttons. Choose a port, start
and stop the OSR2, and configure some aspects of its range of movement,
without ever opening the plugins menu.
3) Add Twist. Most real movements don’t have twist
(the woman spinning in a circle around your penis). Use the vamX Twist
menu to add OSR2 twist movements to any vamX OSR2 plugin. Twist is near
the end of all TCode and Random Stroker vamX menus. Press MANUAL TWIST, then set the twist speed and range. To stop manual twist and use only the twist (if any) in your current OSR2 plugin, press AUTO TWIST. Once set, your twist settings stay even if you change which OSR2 plugin you are using.
4) Change to hand job or blow job poses in TCode 2.1. Before
vamX, you had to manually set which part of the woman the OSR2 should
respond to. In vamX this is automatically set as you change poses, so if
you were having sex, and switch to a blow job, the OSR2 automatically
changes to respond to the blow job movements of the head.
The following information is for people who want to increase
the size of the twist movements, and have programmed, or know how to
program, their OSR2+ (if you don’t yet know how, you can always subscribe to https://www.patreon.com/tempestvr
then join the Tempest Discord). For manual twist, the default OSR
sketch (.ino file format) has a very limited twist that is designed to
mimic real world twist of the woman’s hips. Unfortunately there isn’t
much twist in most sex movements, so this isn’t very useful. The twist
is more stimulating when set as an extra stimulation without being
linked to “real” scene movements. The default OSR ino sketch has a
relatively small twist range, which can easily be expanded by changing
some values in the sketch. Search for “Mix and send servo channels” and
find two lines that say twist = twist = (xRot –
map(twistPos,-1500,1500,9999,0))/5; twist = constrain(twist, -750,
750); Try changing the -1500 and 1500 to -4500 and 4500, then commenting
out the second line. The result looks like this for OSR2-Release3_2
twist = (xRot – map(twistPos,-4500,4500,9999,0))/5; //twist =
constrain(twist, -750, 750); You then need to press the Upload button to
send the sketch to your OSR2. You can experiment with these constants,
or leave twist with constrain set to other values, if you wish.
CREATE A CUSTOM POSE (Advanced Users or Creators Only!)
1) Go to Pose -> Move Pose & Custom Poses
2) Press Save Custom Poses. Once
you press Save Custom Poses vamX will stop animating / moving the people
in the scene (until you finish creating and saving the pose).
3) Adjust the pose, or load a new pose, and position
both people as you wish. If you don’t know how to make poses you’ll
need to watch other Virt-a-Mate tutorials on creating poses.
4) Choose what you want your pose relative to by pressing one of the SAVE POSE as buttons.
In general poses in Virt-a-Mate are saved in an absolute location. In
vamX, poses are often saved relative to known locations, such as a good
standing area designated for each scene. If you want to create a pose
that will load correctly in all vamX environments, put your pose in the
appropriate location in the default vamX Antique Room (fireplace room)
and choose to save relative to the bed, standing or seated locations.
For example, if you place your new pose in the same place as the normal standing poses in the Antique Room (which is by the dresser and mirror in that room) then choose SAVE POSE as Standing Pose, your new pose will load in the standing pose location in all vamX Scenes.
5) Choose a save slot. There are 10 save slots that
are SHARED. If you save a standing pose into slot 1, then later save a
seated pose into slot 1, you will overwrite the standing pose. You can save up to 10 total custom poses.
6) Your pose won’t be perfect the first time. vamX tries to
align your new pose to vamX’s variety of sexual actions. You will
probably need to adjust your pose a few times and click Save again if
you want your pose to be well aligned. Not all custom poses will be able
to align perfectly even after adjustment.
You can then quickly load custom poses using the Pose -> Move Pose
& Custom Poses -> Load Custom Pose 1 (through 10) buttons. You
can also load (but not save) Custom Poses with voice commands, such as
Load Custom Pose 1, or just Custom Pose 1.
STORY CREATION & MANUALLY TRIGGERING VAMX COMMANDS
Story Creation Create your own Stories Beta (Advanced Creators Only) Use
the vamX simple scripting language to create your own stories. This
requires (spending hours) manually editing text files and entering in
exact commands as specified by the vamX scripting command documentation
and examples. Join the discord to learn more and share stories: https://discord.gg/V7qvdCceEF
To manually trigger a vamX button (VaM Expert Creators Only), use the story code for that button/command.
1) Go to Other -> Stories -> 2nd Page -> Story Code Output ON (then open the Virt-a-Mate blue log window).
2) Use the vamX menu to do something that is a vamX button press. For example go to Pose -> Standing -> Supported Poses & Props -> 1st Milking Table Pose. You will see something like “[WAIT:1.777374; BUTTON:Pose Standing|21]” output. This is the code. Use only the text starting with BUTTON and remove the [] so you have something like BUTTON:Pose Standing|21
3) Add a Button (or other trigger type object or use a plugin that can trigger things). If you add a button you need to add a Discrete Action and in Settings for that action:
Action 1):
Receiver Atom -> __vamX Plugin
Receiver -> plugin#0_vamX.BL_GUI
Receiver Target -> JSONStringSTORYCOMMAND (near the bottom)
Text to Send -> BUTTON:Pose Standing|21 (or whatever single line of story code you generated)
Action 2):
Then add a second Discrete action (this one must be below the other)
Receiver Atom -> __vamX Plugin
Receiver -> plugin#0_vamX.BL_GUI
Receiver Target -> JSONActionPARSESTORYCOMMAND (near the bottom)
4) Now pressing the button will execute that vamX command. You can also call these functions using script or other plugins in a similar way (you would need to understand scene creation / scripting of course).
For advanced users or scene creators you can also disable various parts of vamX in the vamX plugin custom UI. Open the __MOVE_LIGHTING_RIG0 atom -> Plugins Tab -> plugin#0_vamX._CHOOSE_VAMX_FEATURES -> Open Custom UI…
Go through the new HELP -> Custom Scene tutorial. This teaches the new Custom Scene tools (automatic pose placement, quick pose sex sequence, and using vamX in any Virt-a-Mate scene). If you need a more detailed description of the Custom Scene buttons’ functionality, read the numbered list below.
When using Add vamX or Merge Loading vamX
into any Virt-a-Mate scene you create what we call a Custom Scene. This
build has numerous important features for Custom Scenes:
1) Automatic Pose Placement. An initial starting pose
location is chosen automatically. You can then switch to other detected
good locations by pressing Scene -> Custom Scene -> NEXT POSE LOCATION (On Floor) or Next Bed Location (Raised Surface). To
get back to the original scene starting location, press STARTING FEMALE
POSE LOCATION. Next Bed Location switches to any locations not detected
as the most common height, generally a raised location but if the scene is mostly floor, plus a lower area, then the “bed” locations are this lower area.
2) Next SEX STAGE & Next POSE buttons (2nd page of Custom Scene). These make it easier to navigate through the great variety of vamX poses without switching out of the Custom Scene area. The first stage is a dance tease, followed by lap dance, foreplay and sex. In each stage you can switch between multiple poses that fit that stage. Further stages continue to different kinds of sex, pausing for more foreplay and nice views along the way. You can also just stop and choose whatever pose you want in the Pose tab at any time.
3) Before switching to a vamX pose, if your custom scene has
animation that is effecting the people, you need to stop that animation.
You can do this using buttons on the 3rd page of Scene -> Custom
Scene. Press PAUSE OTHER SCENE ANIMATION to
stop Scene Animation. Scene Animation can animate people, it’s just one
way to record animation in Virt-a-Mate. C&G Studio and others use
Scene Animation. You should start by trying this button, as you can
always resume the scene animation by pressing it again. If this doesn’t
stop the people animating, press Stop All ATOM / PERSON ANIMATION.
This stops and removes all timeline animations, built-in Virt-a-Mate
animations, and other forms of animations. If that doesn’t stop the
animation, try Stop Other PLUGINS & ANIMATION. Once the person is no longer animated, you can switch to vamX Poses and Actions.
4) You may have audio in the scene but want to replace it with a vamX voice, or vamX background music. To do this, press Scene -> Custom Scene -> 3rd Page -> Stop All NON-VAMX SOUND. You
can also stop all local background music, including that in merge
loaded scenes, by going to Sound -> Local Music & Sound ->
Off.
5) On the other hand, some scenes may have female moans you
want to keep, in which case you might not want the vamX moaning /
talking. If so, press Scene -> Custom Scene -> 3rd Page -> Stop All VAMX MOANS & SPEECH.
6) For Custom Scenes, changing the lighting in the vamX Light
tab now removes the lighting setup in the Custom Scene and replaces it
with the vamX lighting setup selected (unless the Custom Scene lighting is a subscene, in which case it’s only changed when changing scenes).
7) After loading any Virt-a-Mate scene and adding vamX, you can now switch to a vamX Scene, keeping the people in the custom scene, but changing the environment. This is especially useful if a scene has
a complex person with attached objects (like horns, weapons, custom
hair as CustomUnityAsset, etc.). Load the scene with the person already
set up, then in the vamX UI, open Scene and choose a new scene.
8) You can now load a scene with a complex person, including
attached assetbundle clothing or hair, and then switch to any vamX scene
while keeping that person intact. For example load a character with an
object in her hand (for example a rifle) and switch to the environment
to a hotel room and have her dance, strip, and have sex. This
makes it easier to use a look from any scene. In the past, if you merge
loaded vamX, you had to stay within the existing scene’s environment.
vamX automatically removes most other Atoms so you can switch to new
vamX environments without having extra walls, floors, or other strange
objects remain. vamX keeps active all objects linked to the person (like
horns), and of course the people’s looks.
9) If you prefer to remove objects attached to people, press REMOVE NON-VAMX ENVIRONMENT.
10) If, on the other hand you want to merge the Custom Scene
with a vamX environment (have all objects / Atoms from both scenes)
press KEEP NON-VAMX ENVIRONMENT. If you haven’t pressed REMOVE
NON-VAMX ENVIRONMENT, you can press KEEP NON-VAMX ENVIRONMENT even after
switching Scenes, to then restore the lost environment.
REPLACE A VAMX VOICE WITH YOUR OWN VOICE FILES
This is for technical users who don’t mind messing around with zipped
files 1) Install 7-zip 2) Extract the latest vamX.1.x.var package to
any location in your computer 3) In the extracted files go to
Custom/Scripts/vamX/resources/dialog/Voices/Candy (choose any voice in
the Voices folder except Maive) 4) You can either replace all files with
exactly the same names, or put different .mp3 files in there, but if
you change the names of the .mp3 files make sure to run _Make File
List.bat on each folder 5) Open the vamX.1.x.var package in 7-zip 6)
Navigate (in 7-zip) to Custom/Scripts/vamX/resources/dialog/Voices, then
delete the Candy folder 7) Drag your modified Candy folder into that
folder 8) Restart Virt-a-Mate to get the changes inside the var package
to show up.
TROUBLESHOOTING
Important Note for Oculus Users: To hear web audio in VaM for Oculus headsets you may need to change your current audio output device to Rift audio (from the bottom right speaker icon in Windows).
If you don’t see a web browser for YouTube music playlists,
Virt-a-Mate’s web browser functionality may be not working on your
computer, and therefore buttons in Sound -> Online Music & Sound
won’t work. A user (thanks VaM Hub user pertily) found that installing a
specific c++ redistributable package solved this issue: https://www.microsoft.com/en-us/download/details.aspx?id=40784
If random changes happen, for example you were in the middle of sex and she starts dancing,
or has chains appear, etc. the voice recognition system may be
interpreting background sounds or noises as voice commands. You can turn off voice recognition by unchecking the Speech Recognition checkbox at the bottom of the vamX Sound tab. If turned off it stays off (even when reloading VaM) until turned on again.
If something goes wrong / strange, the best way to fix everything is
by opening the Virt-a-Mate Main UI (clicking the three bar icon in the
menu) then in the File tab press “Hard Reset”. Then load the vamX scene
again.
After you merge load a scene and set the first pose location, further poses of the same type will load in the same place.
The three types are: bed/lying, standing, seated/chair. If you set a
bed pose, and then change to another bed pose, but your pose loads in
the wrong location, you probably didn’t set things correctly during Move
Pose (you probably moved the female main control node instead of the
“__MOVE_COUPLE_TOGETHER” node). Move Pose is also active right after
merge loading.
If further poses don’t load in place: 1) Choose a bed (or other)
pose. 2) Go to vamX Menu -> Pose -> MOVE POSE (the
“__MOVE_COUPLE_TOGETHER” node will be selected). 3) Move that selected
node using the arrows and semi-circles, without selecting any other
objects or moving anything else. If you change selections, press End
Move then Start Move again. 4) When the pose is aligned press End Move.
Further poses of that type (e.g. bed) will now load in the same place.
Thanks to all of the wonderful content creators for your contributions: vamX Credits